

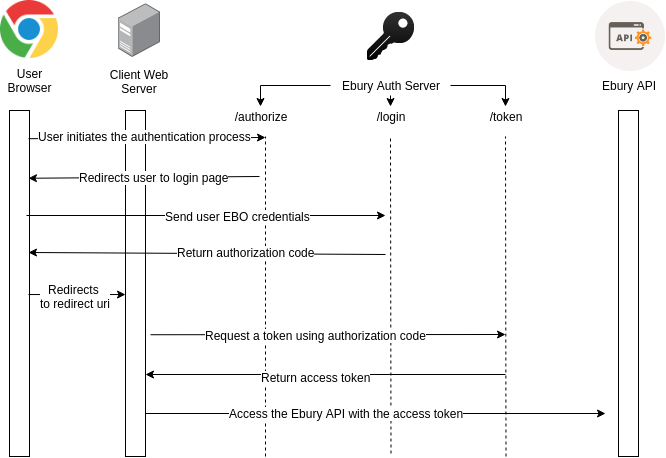
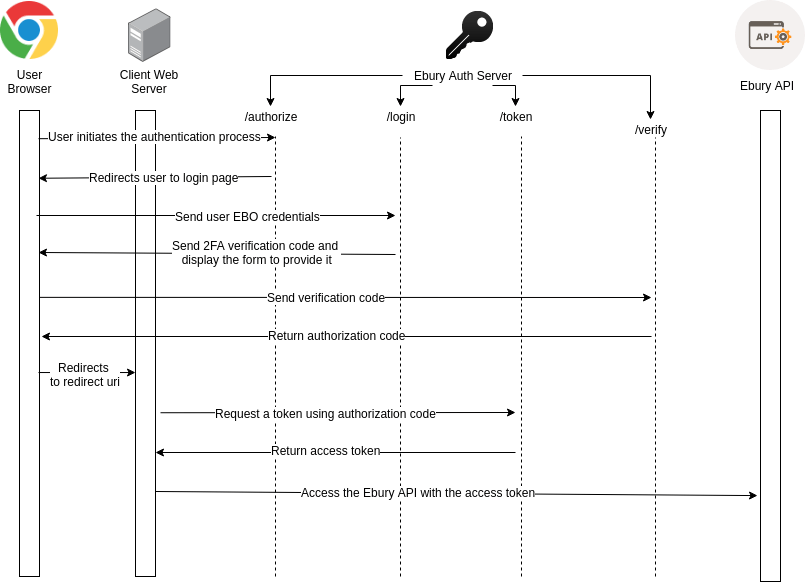
Acquire an access token
Acquiring an access token is a three-step process:- Redirect the user to Ebury to authorise your app
- The user authenticates with Ebury
- If 2FA is enabled, the user provides the verification code on the 2FA screen
- Ebury redirects the user back to your app with an authorization code
- Exchange the authorization code for an access token
Redirect the user to Ebury
For server-based applications, once you have authenticated for the first time you’ll be able to use refresh tokens to reauthorize access (more on this below).
string
required
Your client identifier
string
required
Must be
openid; no other values are supportedstring
required
Must be
codestring
required
A random, per request value used to maintain state between request and callbacks and protect against cross-site request forgery attacks
string
required
The redirect URL that is registered for your application, this must match the value we hold
User Authentication
If all parameters are successfully validated the Authorization Server will present an Ebury login screen. The user will be required to enter their Ebury Online email address and password, as shown below.
string
required
The user’s email address for authentication
string
required
The user’s password for authentication
string
required
Your client identifier
string
required
A random, per request value used to maintain state between request and callbacks
Ebury redirects back to your app
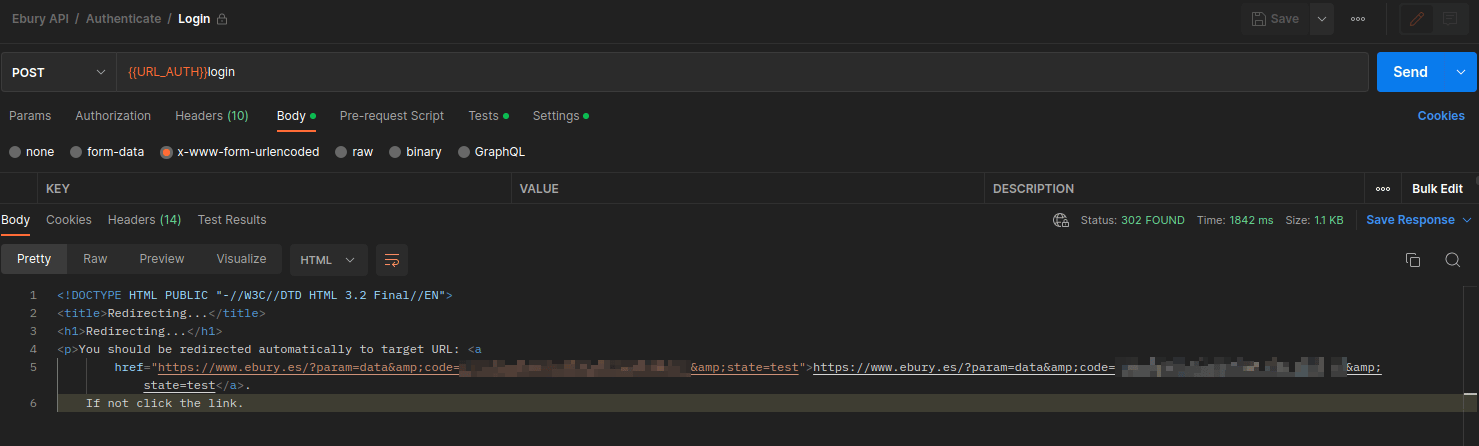
The redirection process occurs after successful authentication. Ebury will redirect the user back to your registeredredirect_uri with the authorization code:
string
required
The authorization code returned by the authorization endpoint
string
required
The state parameter passed from your application in the original authorization request
login request returning a 302 Found response, with the code and state present in the redirect URL:
No-redirect Response
Alternatively, if you prefer to handle authentication programmatically without browser redirects, you can use theNo-Redirect header:
string
required
Set to
application/json to receive the authorization code in JSON format instead of being redirectedstring
required
Must be
application/x-www-form-urlencodedstring
Set to
no-cache to prevent caching of the authentication requestNo-Redirect header is used:
Response
No-Redirect header is included in the authentication request with the value application/json, instead of redirecting the user, the response will contain only the authorization code in JSON format returning a 200 OK response. This is useful for server-to-server authentication flows where you need programmatic access to the authorization code.
Once the credentials have been successfully entered, one of two things can happen:
- If the user does not have Second Factor Authentication (2FA) enabled, the authentication process is completed (Authentication completed)
- If the user has 2FA enabled, go to Second Factor Authentication
Second Factor Authentication
If the user has 2FA enabled, it will be redirected to the 2FA screen and will be issued a 2FA code (SMS/TOTP are supported for now). The user will be required to enter this code, as shown below: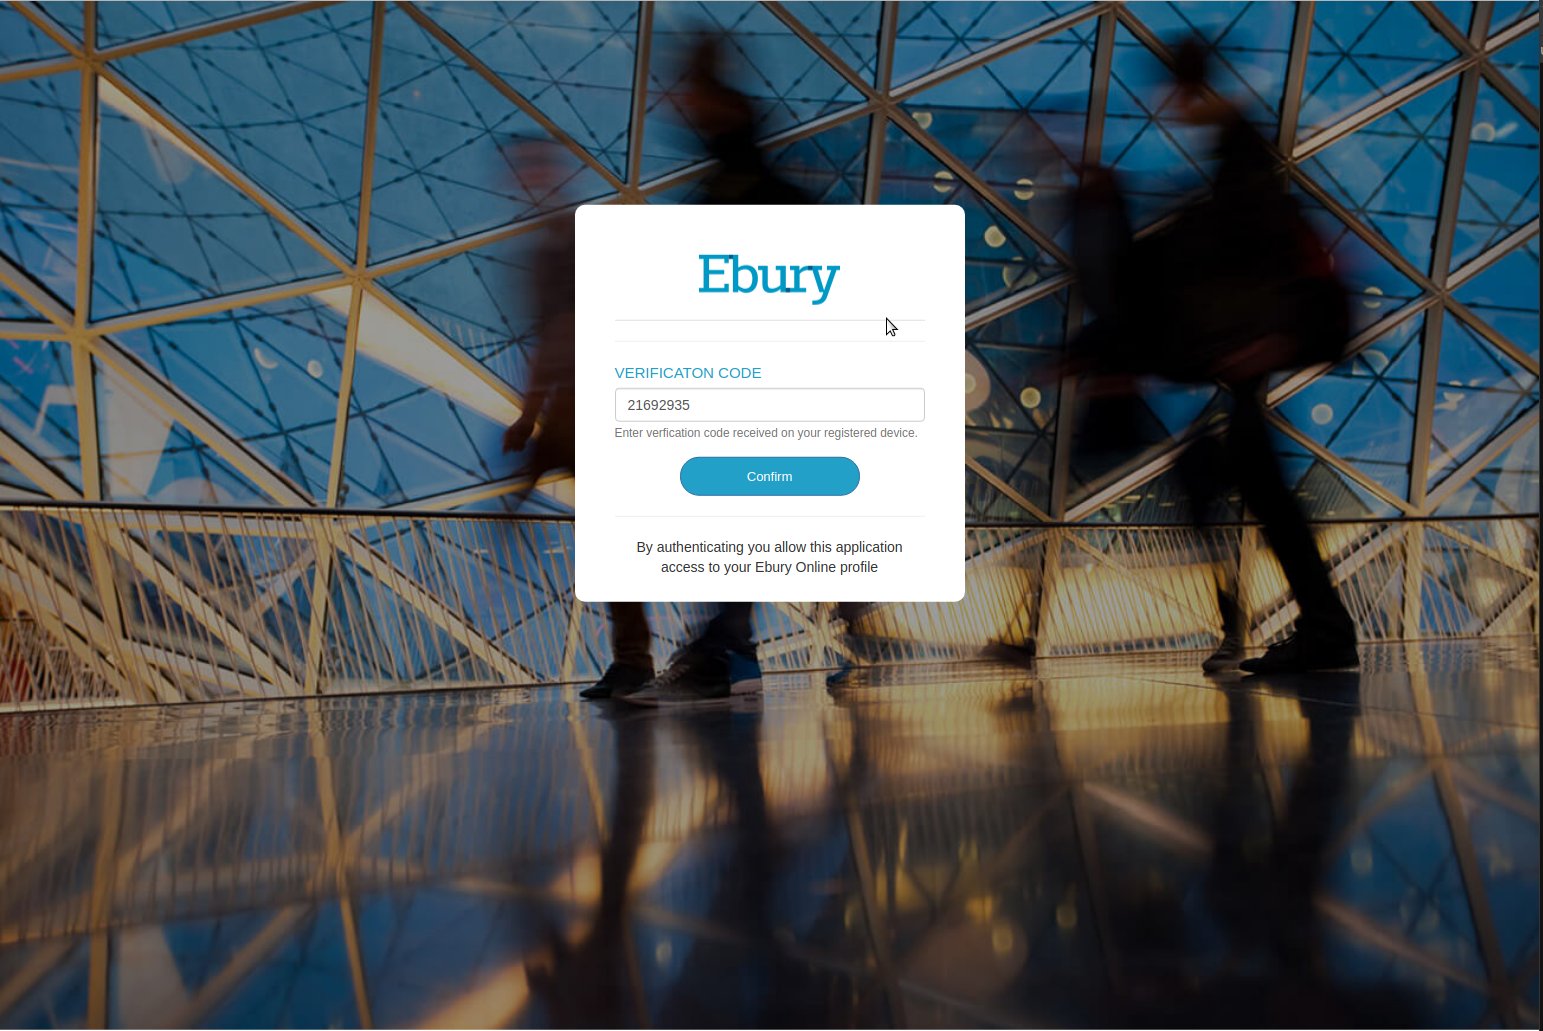
For some reason, if you lose the first verification code, you can request to resend the code (more on this below).
string
required
Value returned by authorization endpoint
string
required
Your client identifier
Authentication completed
After the authentication process is completed, the user will be redirected to theredirect_uri registered for the application. The following querystring parameters will be included:
Response Parameters
string
A code that allows your application to call the Token Endpoint to complete the OpenID flow
string
Value passed from your application in the original authorization request
Exchange the authorization code
Credentials value for the Authorization header:
Response
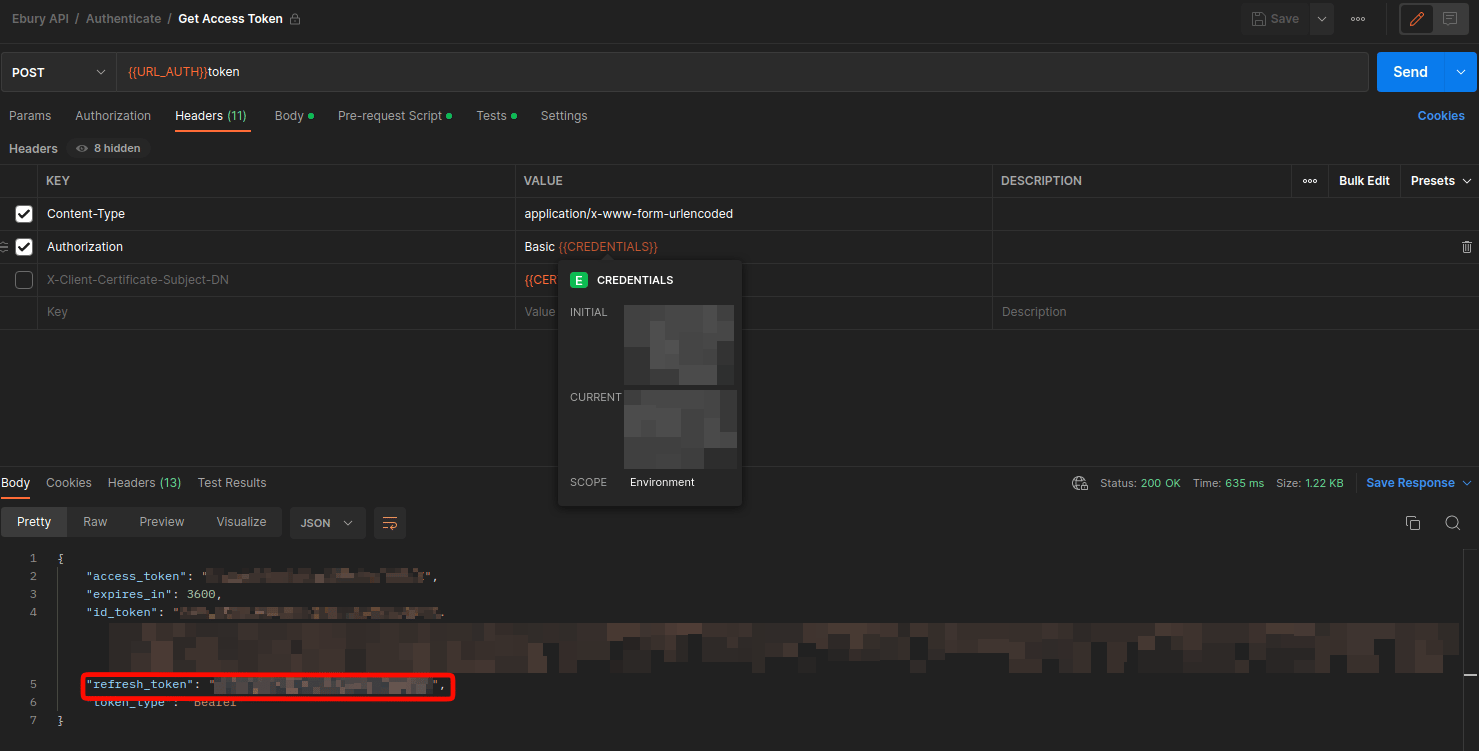
Authorization header takes the form Basic {{Credentials}}, where {{Credentials}} is the base64 encoding of your client_id and client_secret joined by a colon (client_id:client_secret), as shown in the sample above.
The following parameters are passed to the token endpoint
Query Parameters
string
required
Must be set to
authorization_codestring
required
Value returned by authorization endpoint
string
required
The redirect URL that is registered for your application, this must match the value we hold
string
The Authorization header scheme to use when making requests, will be
Bearerstring
An OAuth access token that can be used to call the API
string
An OAuth refresh token that can be used to get a new access token when when the last expires
integer
Expiry period in seconds from time token returned, currently returns
3600 (1 hour)string
A signed, base 64 encoded JSON Web Token that provides verification of the identity that authorized the request. The token includes the client identifier, which is a required parameter on the majority of API calls.
As per the OpenID connect specification for MAC-based algorithms the JSON Web Token is signed with your client secret, allowing you to verify it using an appropriate JSON Web Signature library.
client_id needed for future requests.
An array of client_id and client_name lists the potential clients that the contact can act on behalf of. The majority of customers will only have one client identifier, but some may have multiple client accounts and thus multiple identifiers that the contact can act on
The client_id is required in query params of requests post authentication in order to identify the client to which the request is on behalf of. Your application may have to allow a contact to select the correct client_id to use.
The example below shows the token request with the Authorization: Basic {{Credentials}} header set, returning the access_token, refresh_token and id_token:
Refreshing access
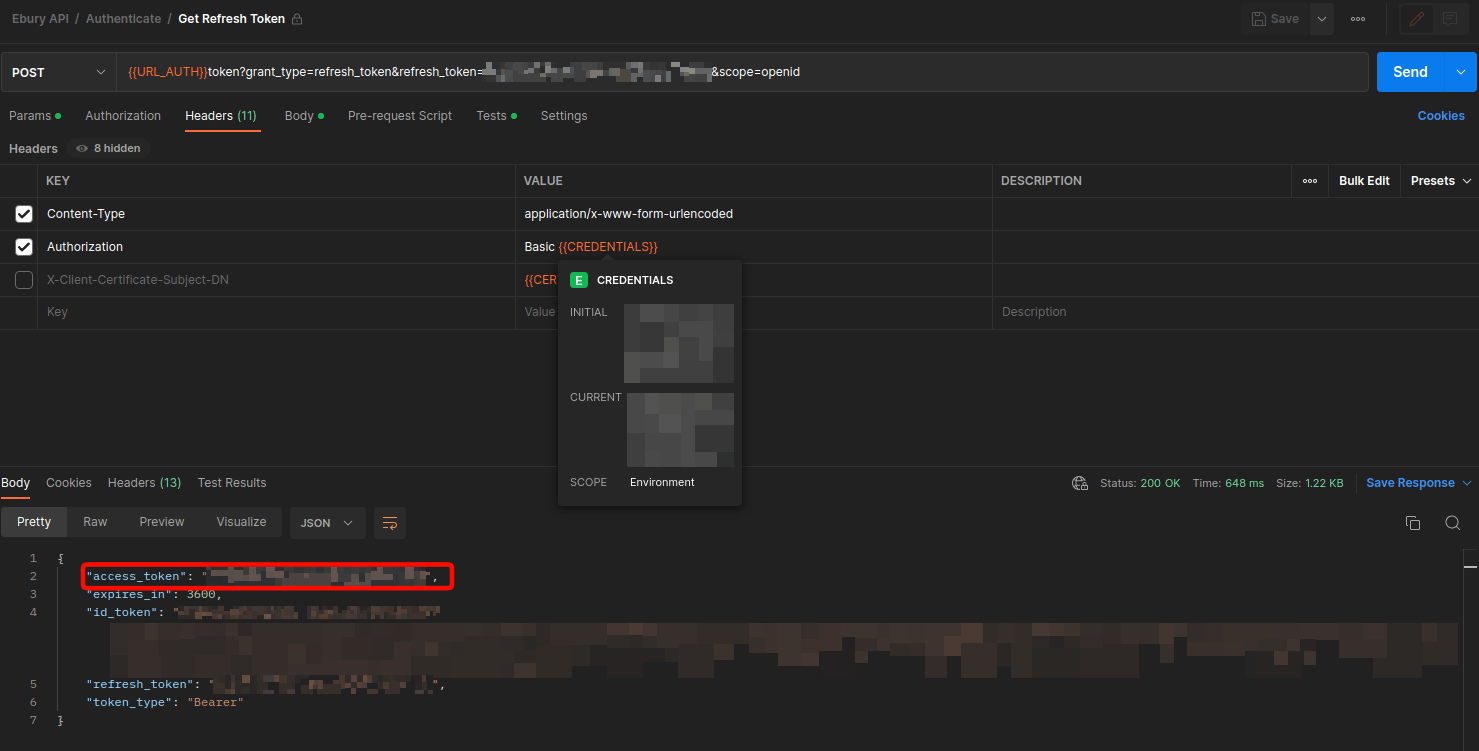
Authorization header for this request is the same as the one used to exchange the authorisation code: Basic {{Credentials}}, where {{Credentials}} is the base64 encoding of client_id:client_secret. Do not use your access token here.
The example below shows the refresh request using the same Authorization: Basic {{Credentials}} header, returning a new access_token:
string
required
Should be
refresh_tokenstring
required
One of the last 10 refresh tokens, issued within the last ‘n’ days. Where ‘n’ is the refresh token lifespan agreed with the client (default value is 28 days).
string
required
Should be
openidGetting an access token on behalf of a client
It is possible for financial institutions to get an access token on behalf of their clients by using the contact id of the client. This functionality is not available per default, you need to contact Ebury to enable it for each contact you need an access token for. This endpoint is only available using mTLS.string
required
The contact identifier
string
required
Should be
client_credentialsAuthenticating requests
X-Contact-Id header.
The
X-Contact-Id header used to be a requirement, but you can safely drop it from your requests and you should do so if possible. If present, it will be checked for equality with the contact id that is making the request.string
required
Your access token, prefixed with the
Bearer schemestring
Your API key (Deprecated)
string
Identifier for an Ebury user (Deprecated)
Trusted authentication
By default when a client connects to a server over HTTPS only the identity of the server is verified. Ebury supports verifying the identity of the client as well by using a client certificate. To use this functionality you need to connect using these URLs instead of the ones you usually use.
Also, note that you will use these endpoints for both authentication and API access. For example:
- To retrieve an access token in the sandbox environment you would call https://trustedsandbox.ebury.io/token instead of https://auth.ebury.io/token
- To create a payment in the sandbox environment you would call https://trustedsandbox.ebury.io/payments instead of https://api.ebury.io/payments
check_cert endpoint.
Response
You can check the next section in order to troubleshoot the issue.
Troubleshooting
In order to use this functionality the client you are connecting with must support the TLS 1.3 protocol, we don’t support older versions of the protocol. You need at least OpenSSL 1.1.1 in order to be able to use TLS 1.3, to check your openssl version you can use:openssl version
Also, the connection must be done by using any of the following ciphers:
- TLS_AES_128_GCM_SHA256
- TLS_AES_256_GCM_SHA384
- TLS_CHACHA20_POLY1305_SHA256
openssl ciphers -v | grep TLSv1.3
If you can run any of these commands and get a successfull verification you are good to go
openssl s_client -tls1_3 -ciphersuites 'TLS_AES_128_GCM_SHA256' -connect tls13.cloudflare.com:443
openssl s_client -tls1_3 -ciphersuites 'TLS_AES_256_GCM_SHA384' -connect tls13.cloudflare.com:443
openssl s_client -tls1_3 -ciphersuites 'TLS_CHACHA20_POLY1305_SHA256' -connect tls13.cloudflare.com:443